The Raptor SD Drive Belt Diagram is a crucial component of the Hustler Raptor SD Parts Manual, providing detailed visuals and instructions for transmission assembly and belt routing.
Overview of the Raptor SD Drive Belt System
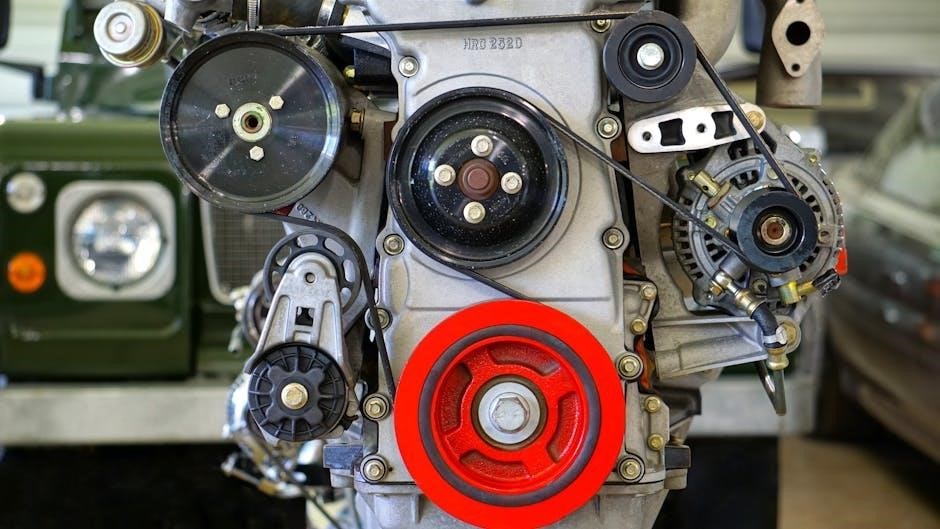
The Raptor SD Drive Belt System is a critical component of the Hustler Raptor SD, ensuring smooth power transmission between the engine and various operational components. This system includes a durable drive belt designed to withstand heavy-duty applications, along with a precise routing configuration to maintain optimal performance. The drive belt connects the transmission assembly to the mower’s drive mechanism, enabling efficient torque transfer. Proper alignment and tensioning of the belt are essential to prevent wear and tear. The system’s design emphasizes reliability and ease of maintenance, with clear guidelines provided in the parts manual. Understanding the drive belt system is vital for troubleshooting and ensuring the longevity of the Raptor SD’s operational efficiency.
Importance of the Drive Belt Diagram in Maintenance
The drive belt diagram is indispensable for maintaining the Raptor SD, offering a visual guide for belt routing, tension adjustment, and replacement. It ensures technicians can identify components quickly, reducing downtime during repairs. Proper belt installation and alignment, as shown in the diagram, prevent premature wear and potential system damage. Regular maintenance, guided by the diagram, helps maintain optimal performance and extends the lifespan of the drive belt. Additionally, the diagram aids in diagnosing issues such as misalignment or improper tensioning, which are common causes of belt failure. By following the diagram, users can perform accurate inspections and replacements, ensuring the Raptor SD operates efficiently and reliably over time.
Understanding the Raptor SD Parts Manual
The Raptor SD Parts Manual provides detailed information on transmission, drive belt, steering, and brake components, essential for maintenance and repair, including torque specifications and part listings.
Structure and Content of the Parts Manual
The Raptor SD Parts Manual is organized into sections covering transmissions, drive belts, steering, and brakes. It includes detailed illustrations, torque specifications, and part listings. The manual begins with an overview of the transmission assembly, followed by specific instructions for drive belt routing and installation. Additional sections provide torque values for threaded fasteners and guidance on replacing components. Illustrated parts listings help users identify and order necessary parts. The manual also includes decals and charts, such as belt routing and battery warnings, to aid in maintenance and repairs. This comprehensive structure ensures users can efficiently navigate and locate information for servicing the Raptor SD.
Locating the Drive Belt Diagram in the Manual
The drive belt diagram in the Raptor SD Parts Manual can be found in the Transmission Assembly and Drive Belt section. This section is typically located in the manual under the “Transmissions, Drive Belt, Steering & Brake” category. The diagram is often presented on multiple pages, providing detailed visuals of the belt routing and installation. Users can locate it by referencing the table of contents or searching for “Transmission Assembly & Drive Belt” within the manual. Additionally, the manual includes decals and charts, such as the belt routing decal, to further assist in identifying the correct belt configuration for the Raptor SD model. This ensures accurate and efficient servicing.
Transmission Assembly and Drive Belt
The transmission assembly and drive belt system in the Raptor SD are essential for power transmission, with the belt connecting components and ensuring smooth operation.
Transmission Assembly Overview
The transmission assembly in the Raptor SD is a critical component responsible for transferring power from the engine to the wheels. It consists of gears, bearings, and other mechanical parts that work together to ensure smooth operation. The drive belt plays a vital role in connecting the transmission to the engine, enabling efficient power distribution. Proper assembly and alignment of these components are essential for optimal performance and longevity. Regular maintenance, as outlined in the parts manual, helps prevent wear and tear, ensuring the transmission and drive belt function seamlessly. Understanding this assembly is key to diagnosing and resolving any issues that may arise during operation.
Drive Belt Routing and Installation
Proper drive belt routing and installation are essential for ensuring the Raptor SD’s transmission operates efficiently. The parts manual provides a detailed diagram illustrating the correct routing path, which must be followed precisely to avoid misalignment. Incorrect routing can lead to uneven wear, reduced performance, and potential belt failure. During installation, ensure the belt is securely fastened and properly tensioned. Referencing the manual’s specifications guarantees accurate placement and prevents damage to adjacent components. Adhering to these guidelines ensures optimal power transfer and extends the lifespan of both the belt and transmission assembly. Always double-check the routing against the diagram to confirm correctness before operation;

Drive Belt Specifications and Requirements
The Raptor SD drive belt must meet specific technical specifications outlined in the parts manual, including material type, size, and tension requirements to ensure optimal performance and durability.
Technical Specifications of the Drive Belt
The Raptor SD drive belt adheres to precise technical specifications, including dimensions, material quality, and tensile strength. It is designed to withstand the rigors of continuous operation, ensuring reliability and longevity. Proper belt material ensures heat resistance and durability, while accurate dimensions prevent slippage and misalignment. The specifications are detailed in the parts manual, providing clear guidelines for selection and replacement. Adhering to these standards ensures optimal performance and prevents premature wear. Regular inspections and timely replacements are crucial to maintain the belt’s integrity and overall system efficiency. These specifications are non-negotiable for maintaining the Raptor SD’s operational excellence and user satisfaction.
Compatibility and Replacement Guidelines
The Raptor SD drive belt is specifically designed for compatibility with models 932541, 932558, and 932566, ensuring optimal performance and system integration. Replacement guidelines emphasize the importance of using genuine parts to maintain quality and functionality. Cross-referencing the parts manual with the model number ensures the correct belt is selected. Incorrect or generic belts may lead to poor fitment and premature wear. The manual provides a detailed torque chart for hardware, preventing over-tightening or under-tightening, which can compromise the belt’s performance. Proper replacement procedures, including alignment and tensioning, are outlined to ensure longevity and reliability. Adhering to these guidelines guarantees seamless operation and extends the lifespan of the drive belt system.
Maintenance and Inspection of the Drive Belt
Regular inspection ensures optimal performance, preventing premature wear and failure. Check for cracks, frays, and proper alignment. Ensure correct tension to maximize belt longevity and system efficiency.
Regular Maintenance Practices
Regular maintenance ensures the longevity and efficiency of the Raptor SD drive belt. It is essential to inspect the belt for wear, cracks, and misalignment. Cleaning debris from the belt and pulleys prevents damage. Lubricating moving parts and checking tension are also critical. Referencing the parts manual for torque specifications ensures all fasteners are secure. Additionally, monitoring belt noise and vibration can help identify potential issues early. Following a scheduled maintenance routine, as outlined in the manual, helps prevent unexpected breakdowns and ensures optimal mower performance. Proper care extends the life of the drive belt and maintains the overall functionality of the Raptor SD;
Inspecting Belt Wear and Damage
Inspecting the Raptor SD drive belt for wear and damage is vital for maintaining optimal performance. Begin by visually examining the belt for signs of cracking, fraying, or excessive wear. Check for misalignment, which can cause uneven wear patterns. Look for missing chunks or splits in the belt, as these indicate advanced deterioration. Clean the belt and pulleys to ensure a clear inspection. Listen for unusual noises, such as squealing or grinding, which may signal issues. If damage is detected, replace the belt immediately to prevent further damage to the transmission. Regular inspections, as detailed in the parts manual, help identify potential problems before they escalate. Proper inspection ensures the drive belt operates efficiently and reliably. Always follow the manual’s guidance for accurate assessments;

Troubleshooting Common Drive Belt Issues
Common drive belt malfunctions include misalignment, excessive wear, and improper tension. Address these issues promptly to maintain optimal performance and prevent further damage to the transmission system.
Identifying Symptoms of Belt Failure
Recognizing symptoms of belt failure is essential for timely maintenance. Common indicators include unusual noises, such as squeaking or grinding, and visible wear like cracks or fraying. Additionally, misalignment or slipping of the belt can lead to reduced performance. Overheating of the transmission or a sudden loss of power may also signal belt issues. Regular inspections can help identify these signs early, preventing complete system failure. Referencing the Raptor SD Parts Manual ensures accurate diagnosis and appropriate corrective actions, maintaining the efficiency and longevity of the drive system. Early detection is key to avoiding costly repairs and downtime. Always consult the manual for specific guidance.
Common Causes of Drive Belt Malfunction
Drive belt malfunctions often stem from improper installation, incorrect tensioning, or misalignment. Over time, belts can wear due to friction, heat, or exposure to debris. Poor routing, as indicated in the Raptor SD Parts Manual, can lead to uneven stress and premature failure. Additionally, aged or damaged belts may crack or fray, compromising their integrity. Environmental factors, such as extreme temperatures or chemical exposure, can also degrade belt materials. Ignoring these issues can result in reduced efficiency, increased wear on connected components, or complete system failure. Regular inspections and adherence to the manual’s guidelines are critical to preventing these common causes of drive belt malfunction and ensuring optimal performance.
Replacing the Drive Belt
Replacing the drive belt on your Raptor SD involves purchasing the correct replacement belt, loosening the tensioner, removing the old belt, and installing the new one. Ensure proper tensioning and alignment to maintain optimal performance and longevity.
Step-by-Step Replacement Process
The Raptor SD drive belt replacement process begins with gathering tools and materials, including the new belt, socket wrench, and torque specifications from the parts manual. Start by disconnecting the battery to ensure safety. Next, locate the tensioner pulley and loosen it to relieve belt tension. Carefully remove the old belt, taking note of its routing to ensure correct installation of the new one. Install the new belt following the diagram’s routing path, then tighten the tensioner to the recommended torque. Finally, reconnect the battery, test the mower, and check for proper belt alignment and tension to ensure smooth operation. Properly dispose of the old belt and maintain records for future reference.
Tools and Materials Needed
To replace the drive belt on your Raptor SD, gather essential tools and materials. A socket wrench or ratchet set is required for loosening the tensioner pulley. Pliers may be needed for removing the old belt. A torque wrench is necessary for tightening bolts to the correct specifications. Screwdrivers, both Phillips and flathead, are useful for accessing components. Materials include a new drive belt compatible with your model, a belt tension gauge, and torque specification charts from the parts manual. Safety gear like gloves and goggles is recommended. Ensure all tools are in good condition to avoid rounding bolts or damaging parts. Consult the manual for specific torque values and compatible belt types to ensure a proper replacement. Proper preparation prevents delays and ensures safety during the process.
Drive Belt Tension Adjustment
Proper drive belt tension is critical for optimal performance. Adjust the tensioner pulley using a torque wrench, ensuring it meets specifications in the Raptor SD manual.
Proper Tensioning Techniques
Proper tensioning ensures optimal performance and longevity of the drive belt. Begin by loosening the tensioner pulley bolt, then adjust the belt to the recommended torque specification in the Raptor SD manual.
- Use a torque wrench to tighten the tensioner bolt to the specified value.
- Check belt deflection by pressing firmly; it should flex slightly without excessive slack.
- Re-tighten the tensioner bolt after a short test run to ensure consistent tension.
- Consult the parts manual for exact torque values and adjustment procedures.
Improper tension can lead to belt wear or malfunction, so precise adjustment is critical for reliable operation.
Effects of Incorrect Tension
Incorrect tensioning of the drive belt can lead to premature wear, reduced performance, and potential system failure. Over-tensioning causes excessive stress on the belt and pulleys, leading to cracking or breakage. Under-tensioning results in slippage, overheating, and inefficient power transmission. Both scenarios can damage the transmission assembly and connected components. Additionally, improper tension accelerates belt wear, causing misalignment and further complications. It is crucial to adhere to the torque specifications outlined in the Raptor SD manual to ensure optimal performance and longevity of the drive system. Neglecting proper tension adjustment can lead to costly repairs and downtime, emphasizing the importance of precise maintenance practices.

Belt Routing and Alignment
Proper belt routing ensures efficient power transmission and prevents damage. Misalignment can cause uneven wear, noise, and system malfunction. Follow the Raptor SD manual for correct routing paths. Always refer to the belt routing decal for accurate installation to maintain optimal performance and avoid costly repairs. Correct alignment is essential for longevity and functionality of the drive system.
Correct Routing Paths
The Raptor SD Parts Manual provides clear diagrams and instructions for proper drive belt routing. Correct routing ensures efficient power transmission and prevents misalignment. Start by aligning the belt pulleys and securing the belt tightly around them. Follow the belt routing decal for accurate installation. Ensure the belt is seated properly in the grooves and not twisted. Proper tensioning is critical to avoid slippage or premature wear. Refer to the manual for torque specifications and visual inspection guidelines. Incorrect routing can lead to uneven wear, noise, and system malfunction. Always double-check the routing before operating the mower to ensure optimal performance and longevity of the drive system. Proper alignment is essential for maintaining efficiency and functionality. Adhere strictly to the manual’s instructions for best results.
Consequences of Misalignment
Misalignment of the drive belt can lead to severe issues, including uneven wear, increased noise, and reduced system efficiency. Improper routing may cause the belt to slip or rub against nearby components, generating excessive heat and premature degradation. This can result in costly repairs and downtime. Additionally, misalignment can strain the transmission and other connected parts, potentially leading to catastrophic failure. Regular inspections and adherence to the routing diagram are essential to prevent these problems. Proper alignment ensures smooth operation, extends component lifespan, and maintains optimal performance. Always refer to the Raptor SD Parts Manual for precise guidance on belt routing and torque specifications to avoid these consequences. Proper maintenance is key to preventing misalignment-related issues.
The Raptor SD Drive Belt Diagram is essential for maintaining optimal performance and longevity. Proper routing, tensioning, and regular inspections ensure smooth operation and prevent costly repairs. Always reference the manual for accurate guidance to avoid common issues and extend the life of your drive belt system.
Summarizing Key Points
The Raptor SD Drive Belt Diagram is a vital resource for understanding and maintaining the drive belt system. It provides clear visual representations and step-by-step instructions, ensuring proper installation, routing, and tensioning. Regular maintenance practices, such as inspecting belt wear and adjusting tension, are emphasized to prevent premature failure. The manual highlights the importance of using compatible replacement parts and adheres to technical specifications. Troubleshooting common issues, like misalignment or improper routing, is also addressed to minimize downtime. By following the guidelines outlined in the manual, users can ensure optimal performance, longevity, and safety of the Raptor SD drive belt system. Proper adherence to these practices is essential for maintaining efficiency and reliability.
Final Tips for Optimal Drive Belt Performance
To ensure peak performance and longevity of the Raptor SD drive belt, always follow the manufacturer’s guidelines for tensioning, routing, and replacement. Regularly inspect the belt for signs of wear, such as cracks or fraying, and replace it immediately if damage is detected. Use only genuine or compatible parts to maintain system integrity. Proper alignment and routing are critical to prevent misalignment issues. Keep the belt clean and free from debris, as contamination can lead to premature wear. Avoid over-tightening, as this can strain the belt and connected components. By adhering to these practices, you can maximize the efficiency, reliability, and lifespan of the Raptor SD drive belt system.